
In this strange and uncertain time, many Cheerleaders are grappling for ideas on how to stay in shape and not lose all of their tumble skills at home. While this has meant many have forked out for expensive air tracks and other equipment, this isn’t an option for everyone. For those just looking to keep their muscles working and training, there are many home safe tumble drills available.
**Please only attempt skills within your capabilities and where you have adequate space and flooring**
Disclaimer ********************************************************
You acknowledge that all exercise involved a risk of personal injury, including a small risk of serious injury or death, and agree that you are responsible for your health and well-being in relation to any exercise/drill programme that you may undertake, where or not such exercise/drills programme user the health and fitness information on this website.
If you are pregnant or suffer from any medical or physical condition you should not make any changes to your diet, nutrition, lifestyle, activities or exercise programmes based on the health and fitness information published on our website without first consulting your doctor or another suitably qualified professional.
****************************************************************
A good warmup should be completed before attempting any of the below exercises. This should involve 10-15 minutes of cardio and a top to toe dynamic stretch to ensure muscles are warmed up and ready.
Basic Shapes
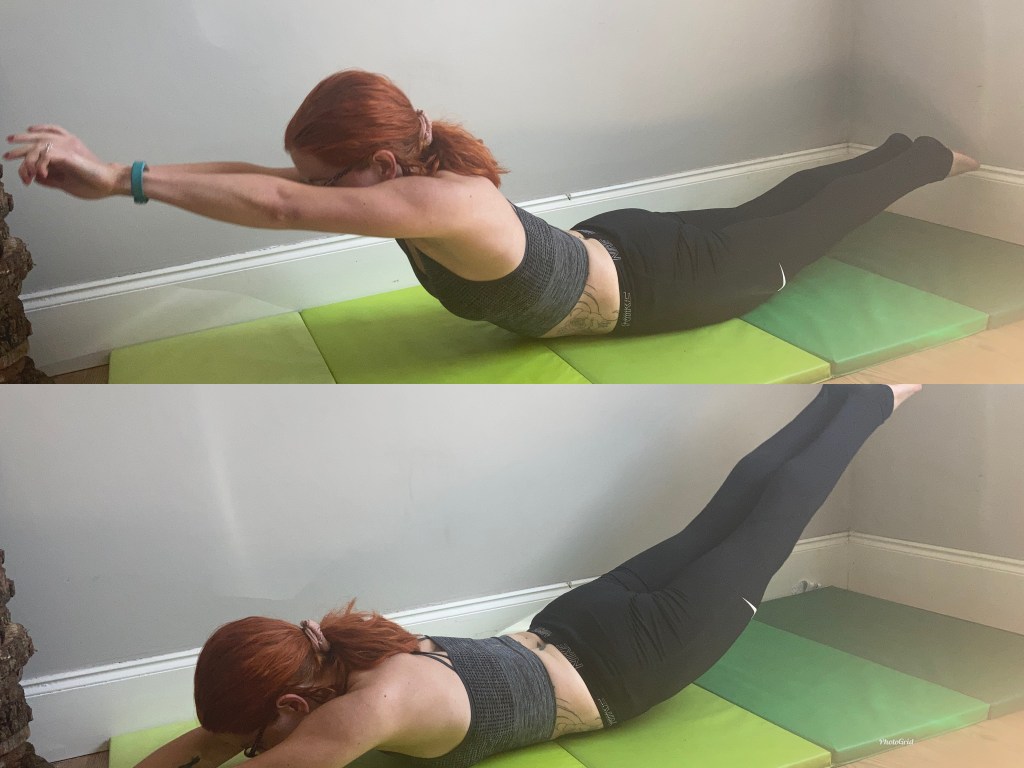
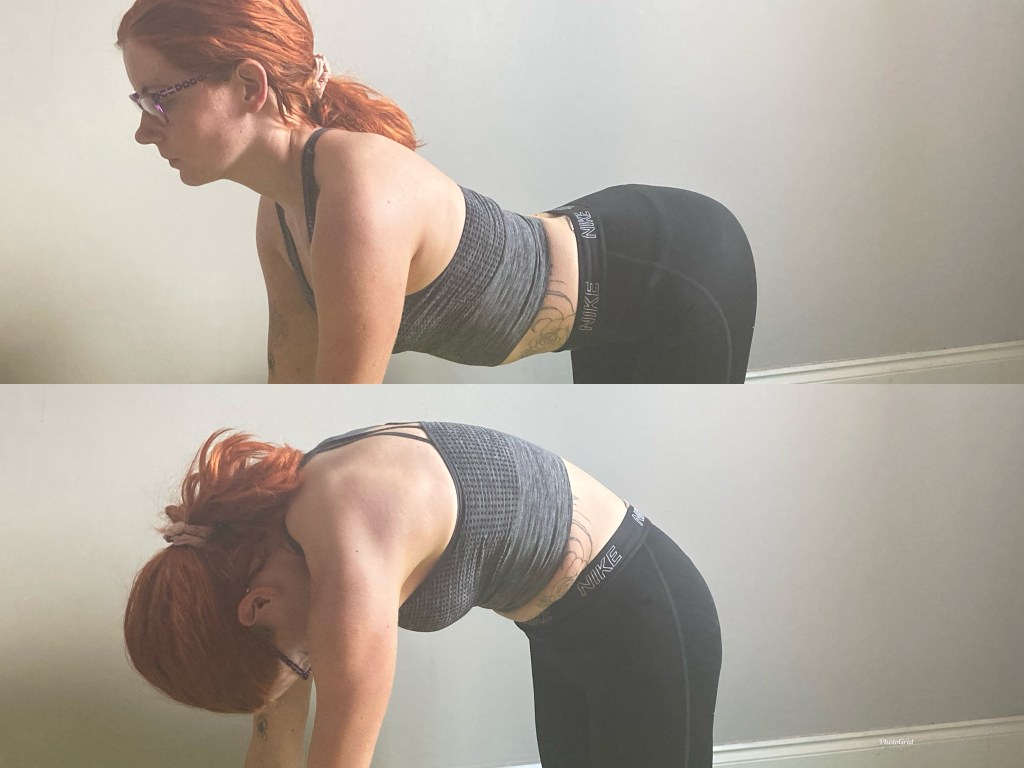
Dish Shape
Dish shapes are a staple body position throughout any level of Cheer and Tumble, from basic handstands all the way through to twists. A good dish shape should involve only the lower back touching the ground, with shoulders and legs only lifted slightly, utilising core strength to stay in place.
This shape can be worked on through a selection of drills, some harder than others
Dish Drills
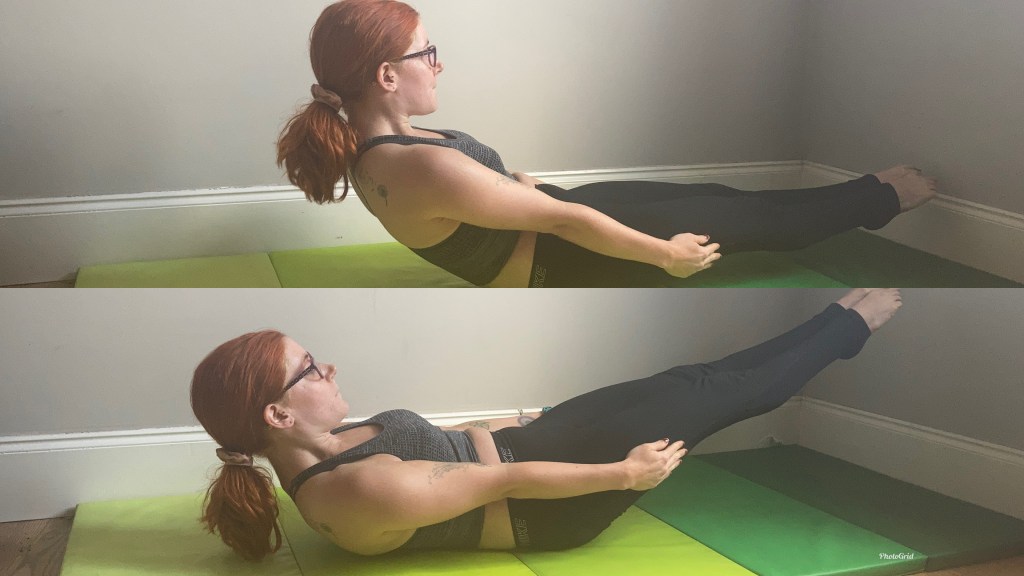
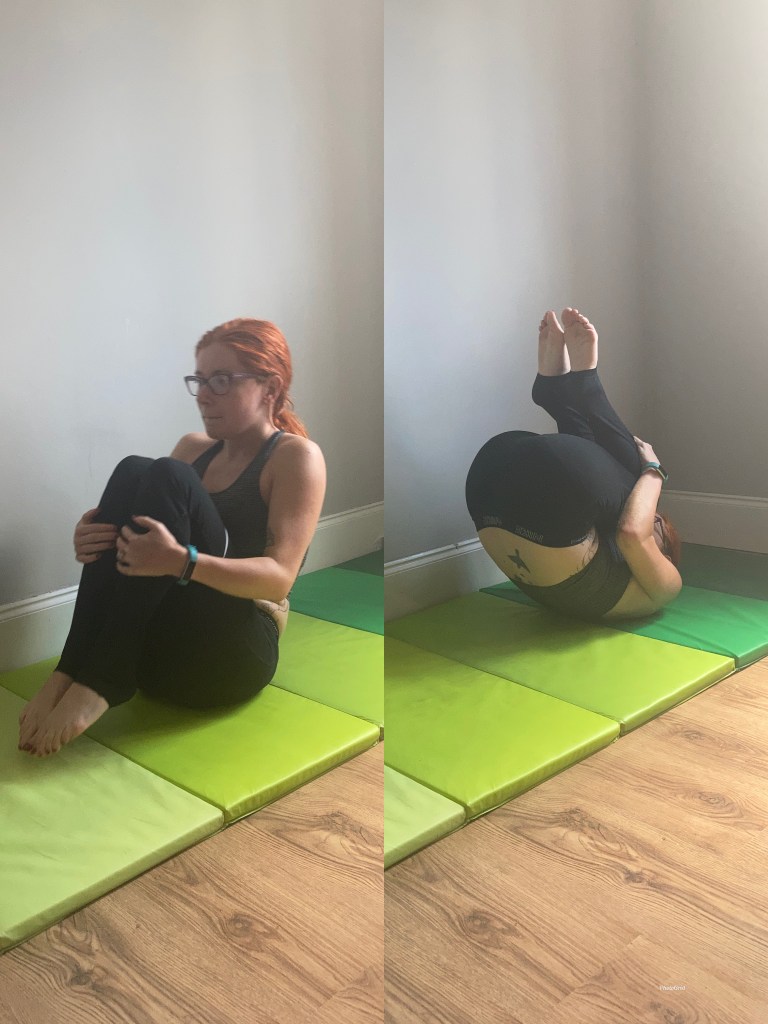
Seated Tuck shape, Lower to Dish
This is a fantastic drill to ensure a correct dish shape is being used. Starting in a seated tuck shape, slowly lie back ensuring the lower back is still pressed into the floor and hips are turned under. Once lying slowly straighten legs out in front, again ensuring the lower back is still pressed into the floor.


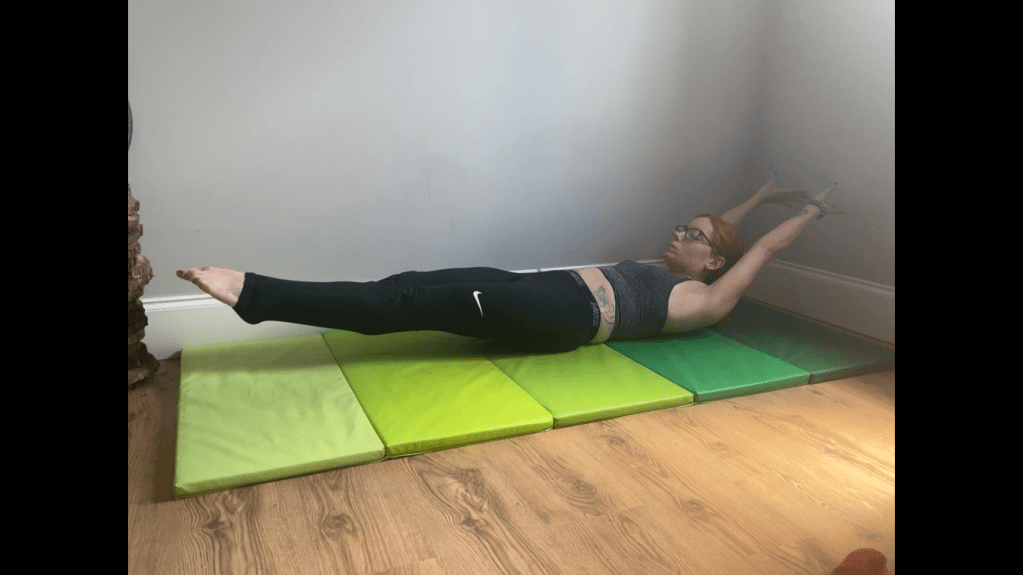
Dish Lifts
Dish lifts really work on core strength. Lying flat on the floor with legs together and arms pressed into ears, lift both arms and legs together into a dish shape, then lower back to the floor. This should be a controlled movement even on the way down, not relying on gravity to return limbs to the ground.
Dish Hold
Dish Holds are relatively self explanatory, but much harder to master. Squeeze core muscles to hold the dish shape for as long as possible.
Dish Rocks
Dish rocks can be tricky to start with but useful in maintaining dish shapes throughout movement. Starting in a solid dish shape and rocking back and forth. The lower back should still be the only body section touching the floor, and the rock should come from core muscles, not throwing legs up to force a rock.
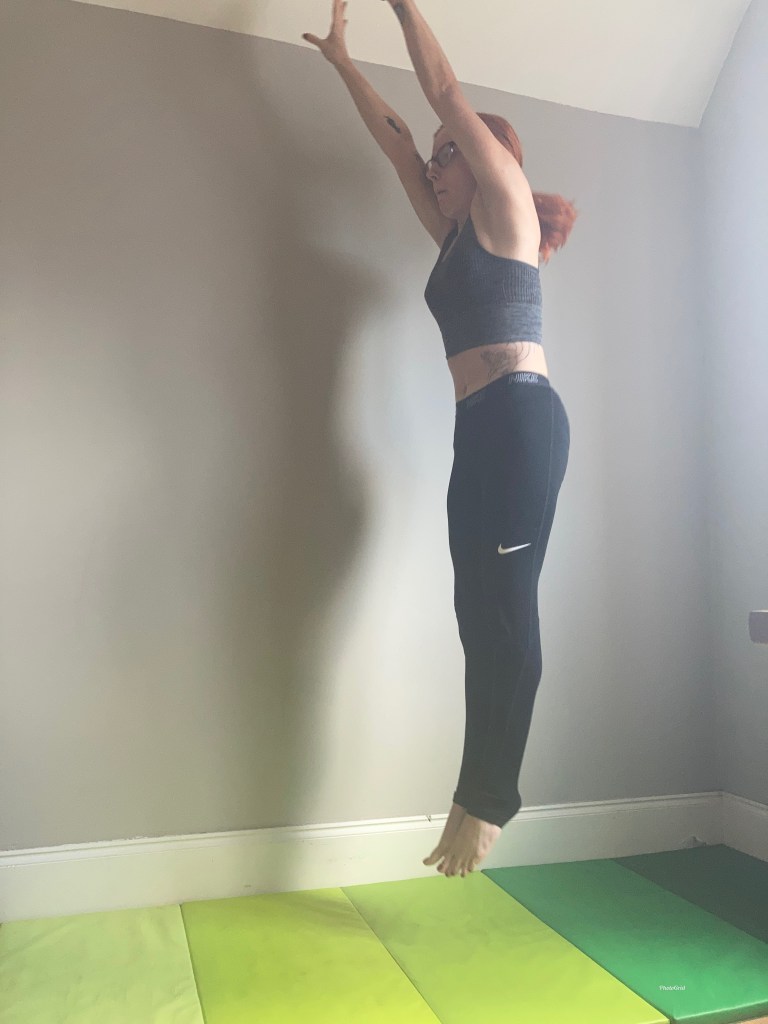
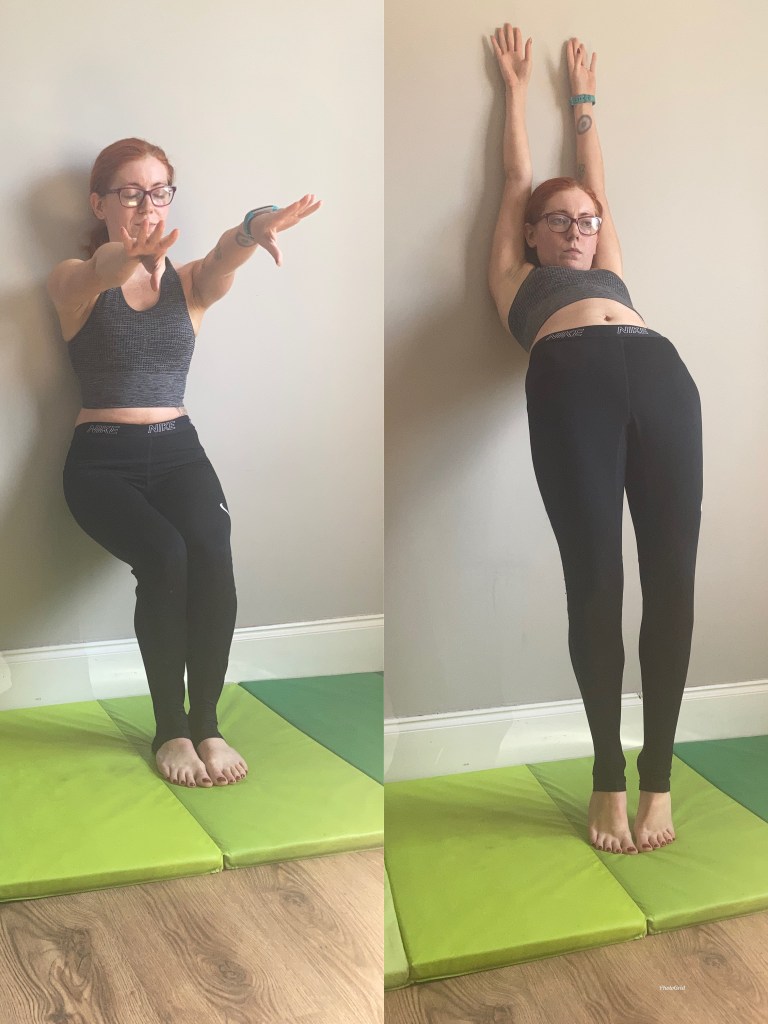
Dish Rebound Jumps
As floor space isn’t always readily available at home, there is a standing option to work on dish shapes. Starting stood up straight with arms by ears, small rebound jumps done bouncing off toes while squeezing core muscles into a dish shape.
Dish to Dish Rolls
Dish to dish rolls are arguably one of the hardest dish drills as they involve a really strong core. Starting in a dish shape lying on the floor, rolling onto the front while still maintaining a dish shape.
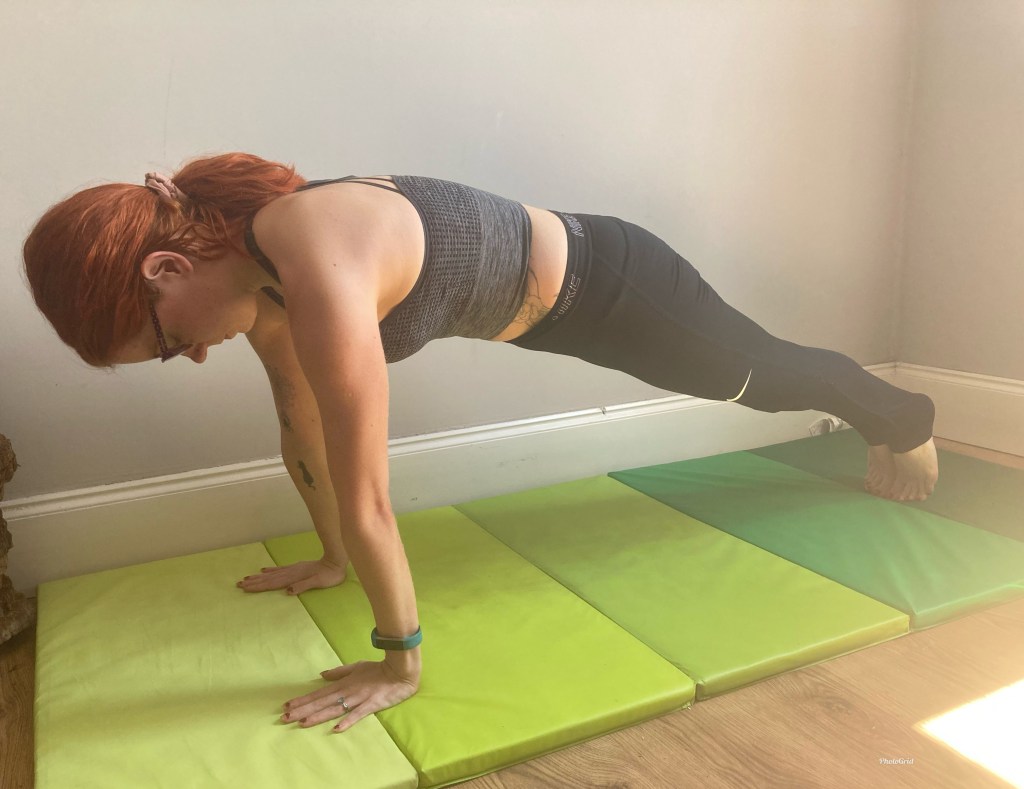
Front Support Hold (High Plank hold)
Many do not connect a front support or high plank shape with a dish, but the core elements remain the same. Core should be squeezed, legs straight and together and shoulders over hands. Ensure the back stays in a rounded dish shape and does not drop to an arch.
Plank Hold
If the high plank hold is easy, try dropping to elbows and work on a plank hold. Again the core should be squeezed, shoulders in line with elbows and legs together and straight.
Front Support Shoulder rocks
Once a solid dish shape front support has been established, shoulder rocks are really useful to ensure the position can be held during movement. Rocking forward and backwards using toes to initiate movement and pushing shoulders closed and open. Core muscles should be engaged throughout and back should not fall to an arch.
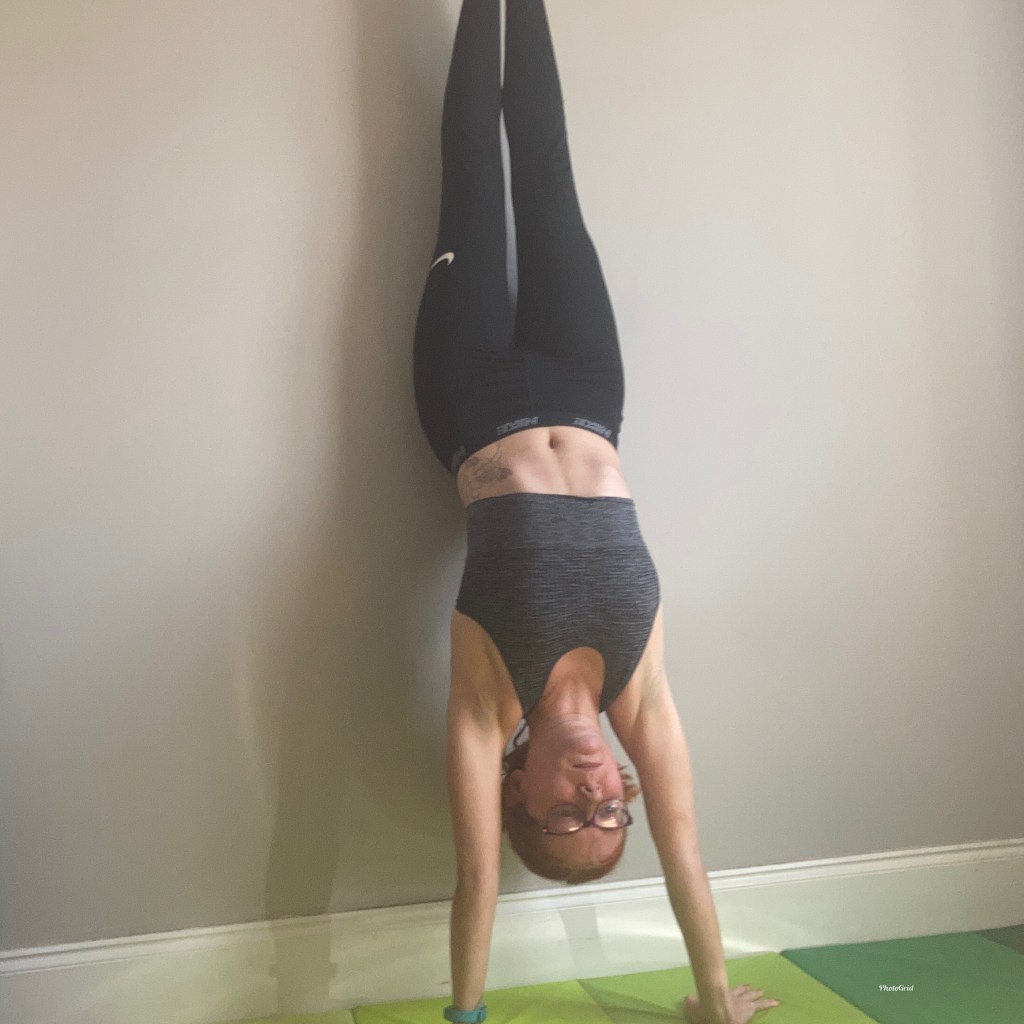
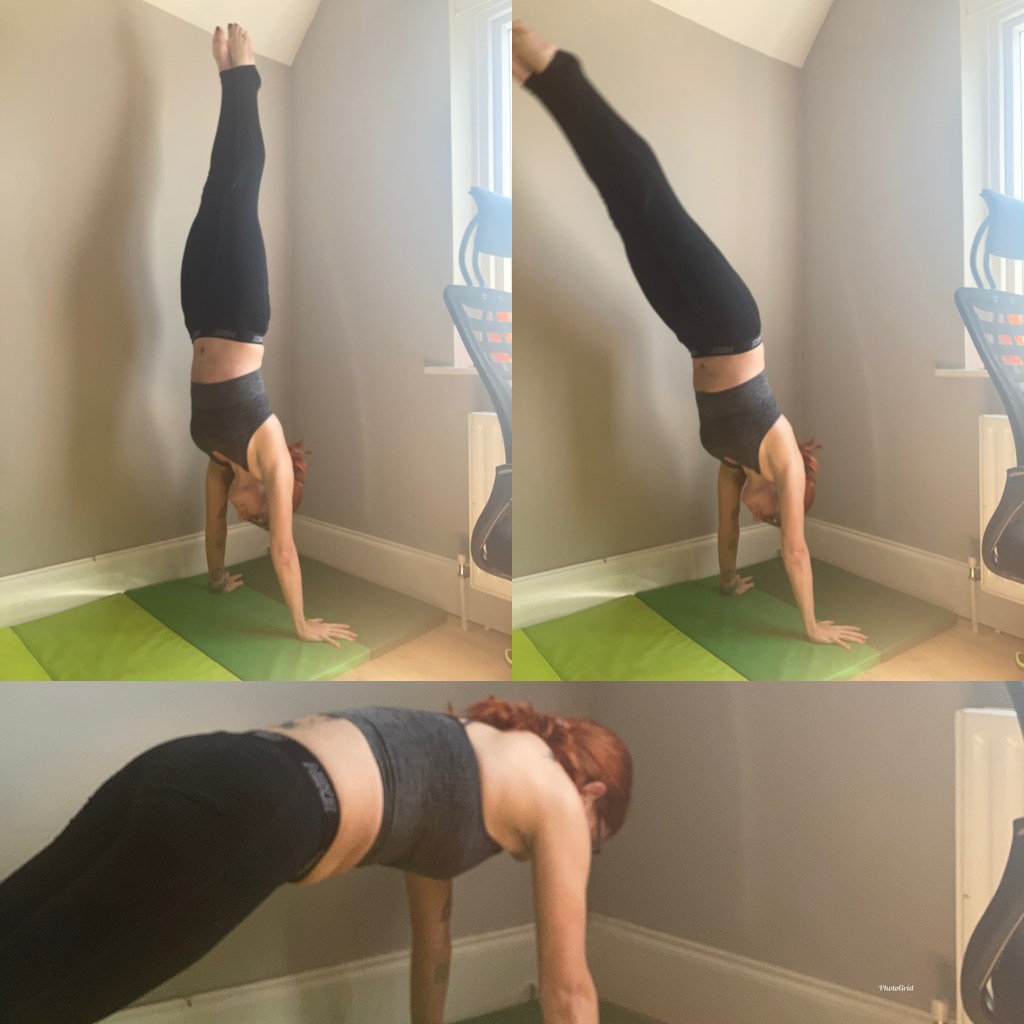
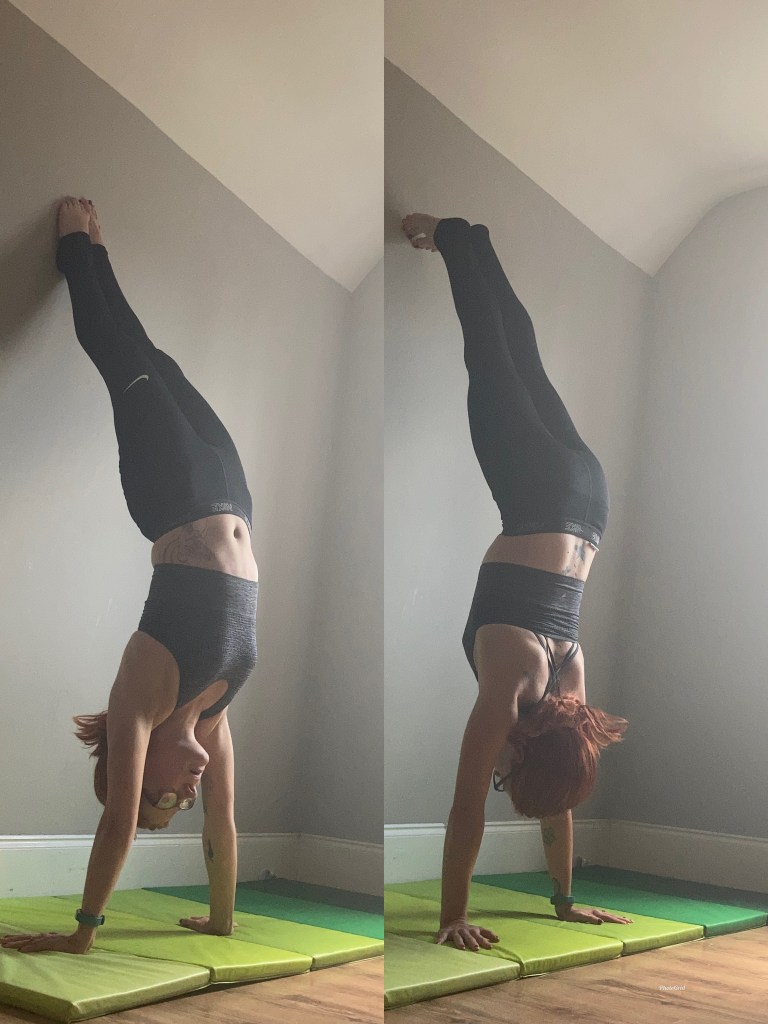
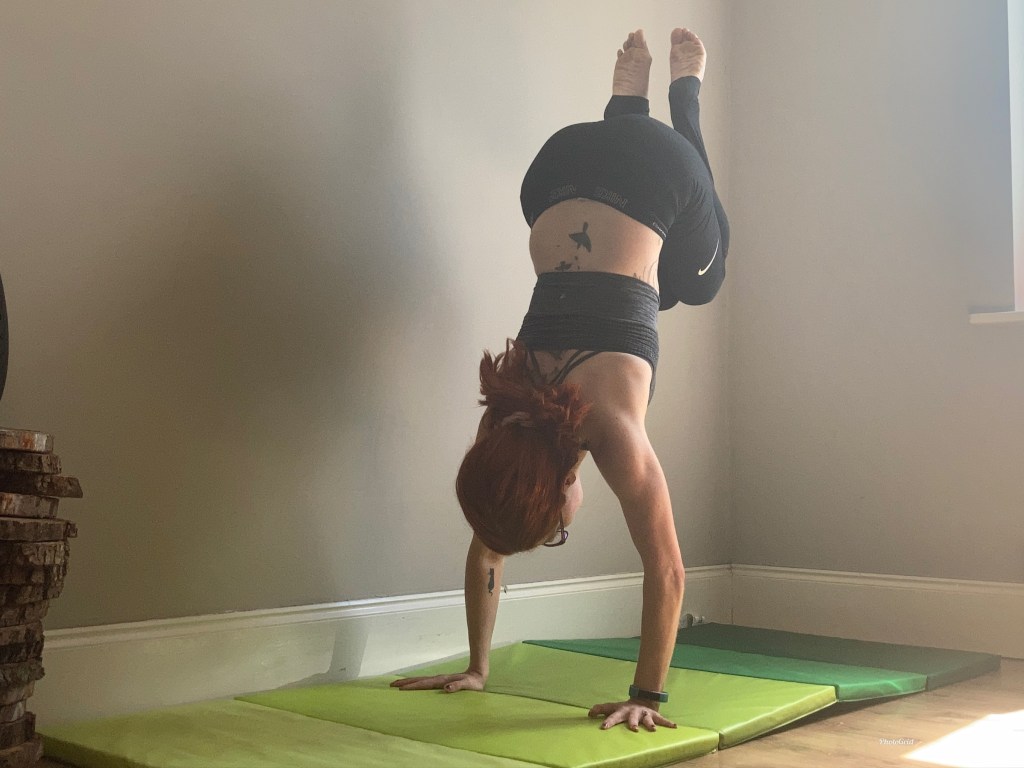
Handstand hold against Wall
Once the lying dish shape has been mastered, the elements can be applied to a strong handstand shape. The best place to start is against a wall to ensure the correct shaping is applied. Shoulders should be rounded, hands underneath shoulders and core squeezed to create a solid dish shape.
Handstand to front support snap
The final drill focuses on being able to hold a dish shape in fast movement. Starting in a solid dish handstand and dropping to a front support shape on the ground. Core should stay squeezed throughout and shoulders rounded.
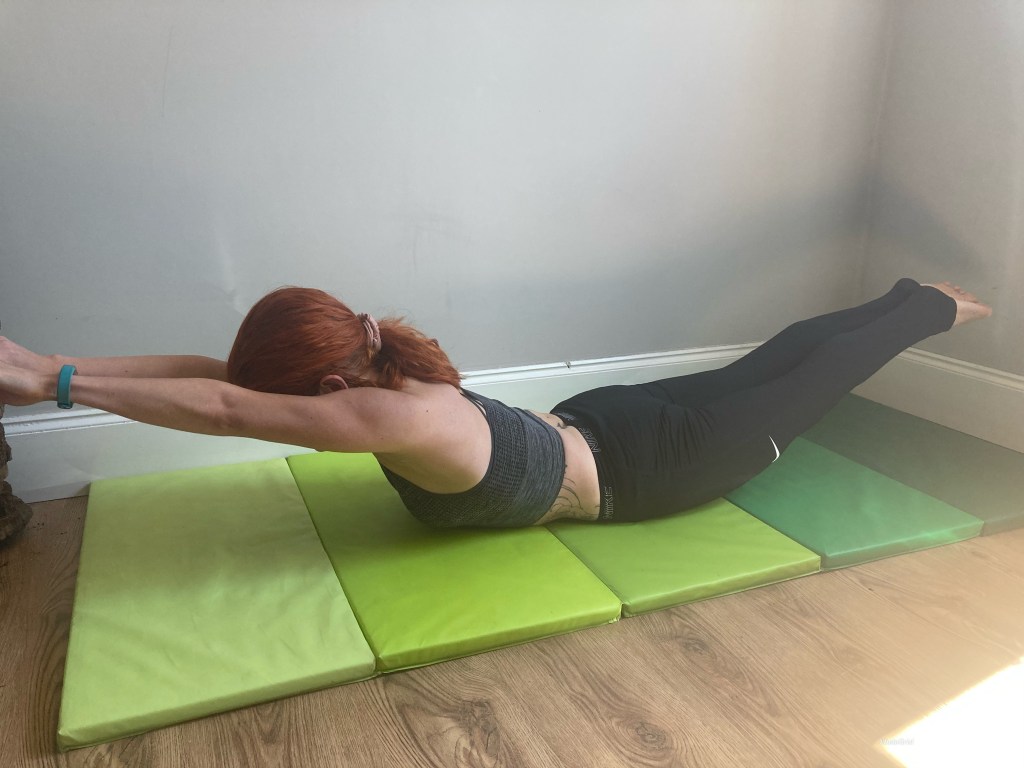
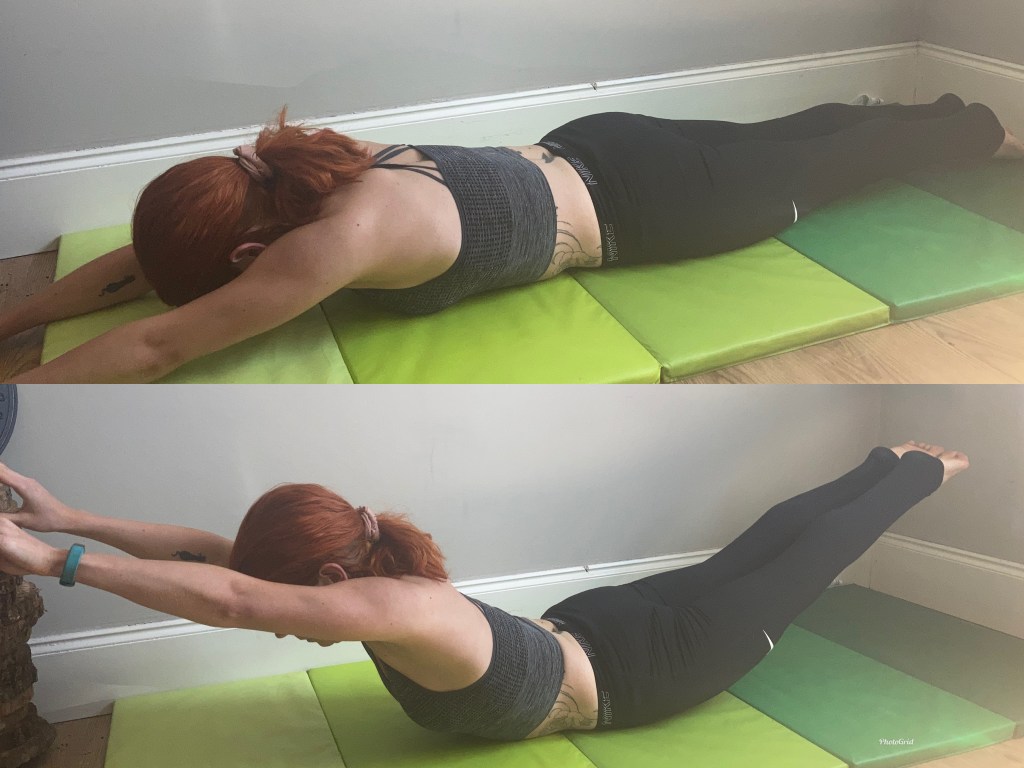
Arch Shape
Another staple body position throughout tumble is the Arch shape. A strong Arch shape should involve only the stomach touching the ground, with arms and legs straight and legs together.
Arch Drills
Arch Lifts
The aim of this drill is to ensure muscles stay engaged in movement. Starting lying flat on the floor face down with arms by ears and legs straight and together. Lift arms and legs off the floor simultaneously into an arch shape and lower back to the ground. Legs should stay together and straight, arms stay by ears and the movement back to the ground should be controlled, not relying on gravity.
Arch Hold
A test of core and lower back strength, holding an arch shape on the ground for as long as possible.
Arch Rocks
Once comfortable with an arch shape, the first progression is the ability to hold the shape in movement. Rising up into an arch shape and rocking back and forth. The rock should be instigated from the core and lower back, legs should stay squeezed together and straight and arms remain by ears. The stronger the arch shape, the easier this becomes.
Arch to Arch Rolls
Another core strength test, Arch to Arch rolls begin facedown in an arch shape, rolling into an arch shape with hips to the ceiling. The intention is to maintain the arch shape throughout and engage core and lower back muscles.
Snap to Arch
This drill can be completed in a number of ways depending on what is available. Starting in a seated pike shape reaching for toes, snapping back to a laid down arch shape pushing hips to the ceiling. Can be done next to a low sofa/bed or onto a sofa cushion/floor pillow/ mat. The drive into the arch should come from the hips, legs should stay straight and feet pointed to ensure the arch isn’t created by pushing off heels. This snap to arch can also be incorporated into set drills for somersaults. For tucks, after hitting the arch roll back into a tucked shoulder stand. For straights, a straight shoulder stand and for twists pulling into a dish and pulling arms down to simulate a twist to the side.
Wall sit snap to arch
If a wall is available then the snap to arch can be completed from a wall sit. Starting slightly in front of the wall, dropping back into a wall sit then reaching back, straightening legs and snapping into an arch shape.
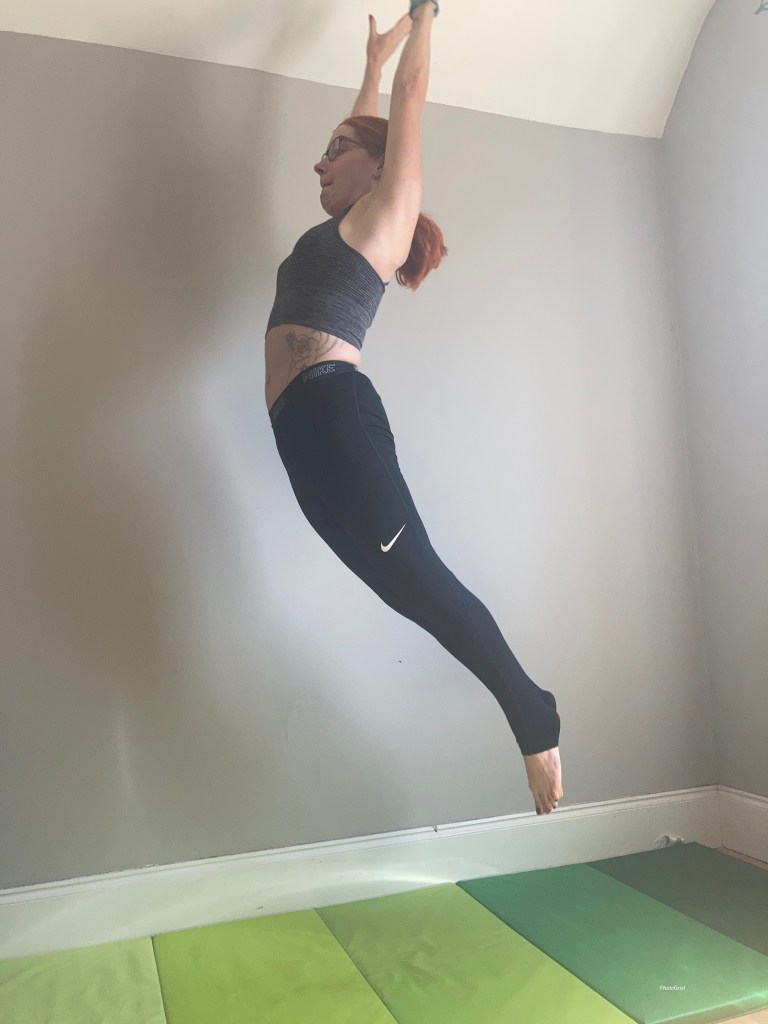
Rebound Arch Jumps
If floor space is an issue, arch jumps can be done standing in minimal space. Rebound jumps should be low and jumps should be completed off the ball of the foot, snapping back into arch then returning to a straight standing position.
Arched Handstand against Wall
If an empty wall is available, arched handstands are a great prerequisite before working walkovers. With hands slightly further away from the wall and body arched back to put feet against the wall. This can be done with whatever degree of arch is comfortable, from a slight arch to a full bridge shape.
Glute Bridge
Once a solid arch shape has been established, the principles can start to be applied to bridges., starting with a glute bridge. Beginning lying flat on the floor facing the ceiling, bending knees and bringing heels into the body and lifting hips up as high as possible. This can be done as a hold or as a movement from flat to lift.
Bridge
Finally moving onto a Bridge, a staple skill for tumbling. An ideal bridge will have straight arms squeezed into ears, legs straight and together and shoulders pushed through.
Bridge rocks
Bridge rocks are a good way to work towards open shoulders in a bridge shape. While in a bridge, rock forwards and backwards to really push through shoulders. This can be done with feet up on a mat/sofa/bed or facing a wall to try and push chest against the wall.
Bridge leg lifts
A great strengthening exercise, again working towards bridge kick overs and walkovers. In a solid bridge shape (Shoulders pushed through, legs straight and together, arms straight and close to ears) Lifting one leg at a time up to the ceiling then returning to bridge shape. Leg should stay straight throughout and the lift should be initiated from the toe, not the knee.

Dish and Arch combined drills
Cat and Cow yoga positions
Borrowing some inspiration from Yoga, Cat and Cow positions are an easy way to work dish and arch shapes. Crouching on all fours and moving between a hunched back and an arched back to really get used to the shapes in a controlled and safe way before moving on to harder drills.
Dish to Arch Rolls
Once comfortable moving between dish and arch in Cat and Cow, dish to arch rolls can really ensure the body positions are solid. Starting in a Dish shape lying on the floor with arms squeezed to legs, rolling over and pulling arms up over the head into an arch shape. Once comfortable, rolling back into dish and snapping arms back to sides. Both dish and arch shapes need to be solid, with legs straight and squeezed together. The arm movements should assist the motion (similar to a twist) but arms should not touch the floor while rolling.
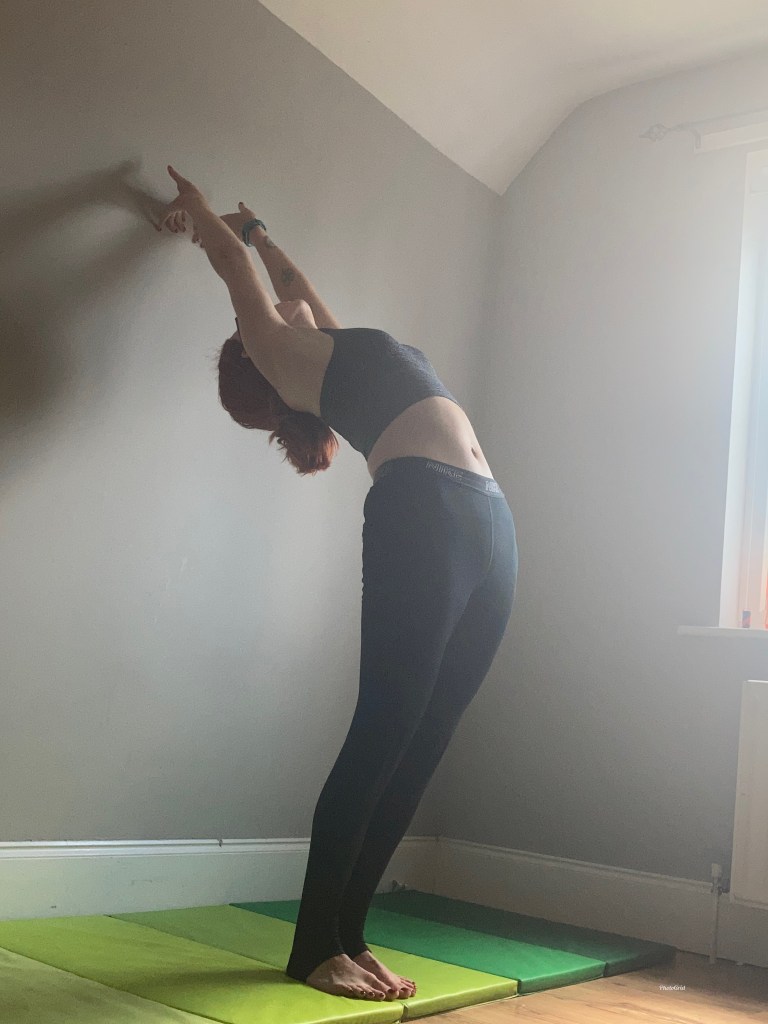
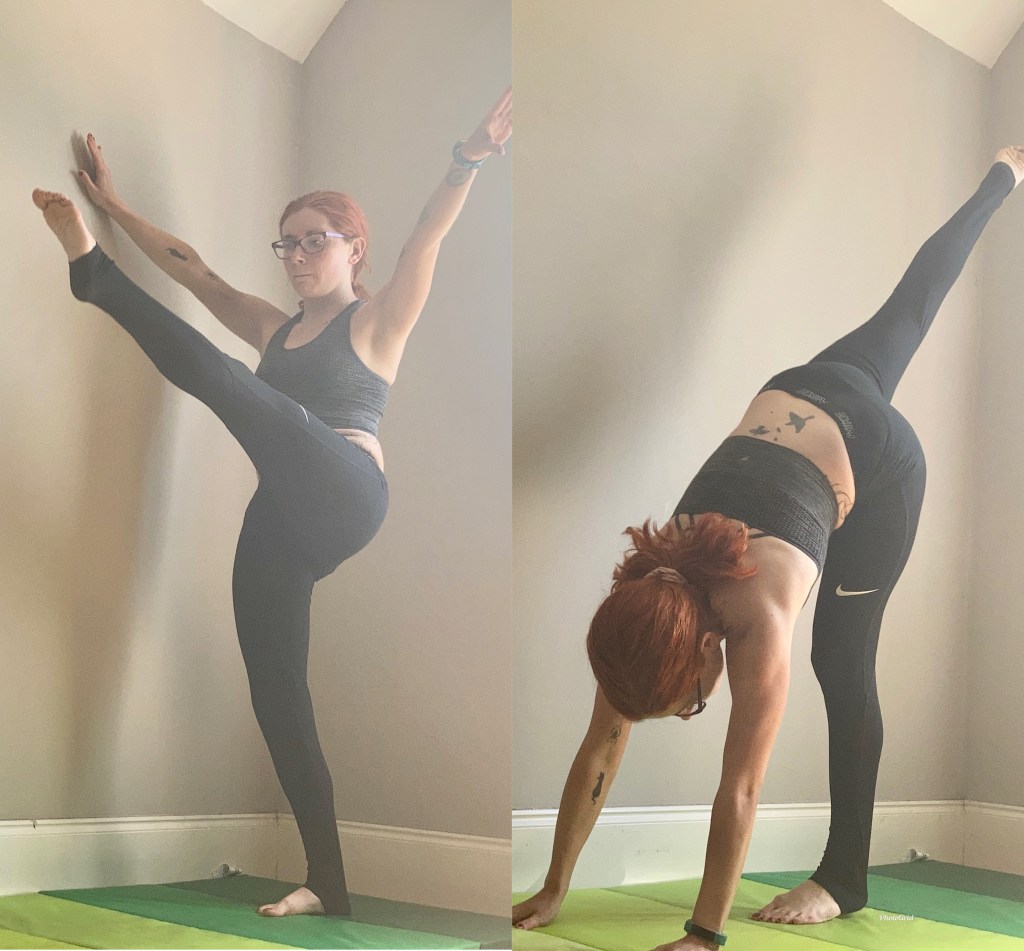
Arch back to wall, return to Dish
A great starter drill to work towards both front and back walkovers. Standing a foot length away from the wall with arms straight and by ears, reaching back to tap the wall then snapping back up, pulling arms down to a standing dish shape. Arms should stay straight throughout. For a more advanced drill step further away from the wall to create a deeper arch.
Dish to Arch handstand against wall
A more advanced version of the Dish to Arch Rolls, starting in an arched handstand with feet against the wall, completing a half handstand pirouette (turning hands) to face the wall with body in a dish shape.
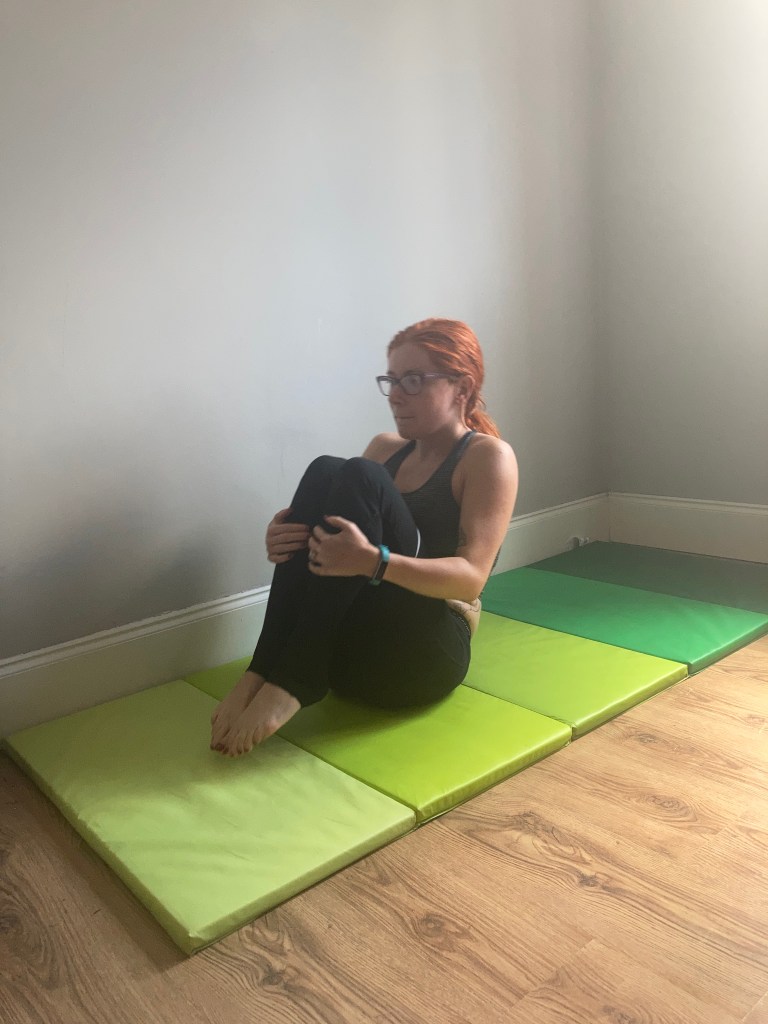
Tuck Shape
The final basic shape is the tuck shape. While this seems simple, it is used in every level from forward rolls to tucks to arabians. A strong tuck shape while sat on the floor should involve feet slightly lifted from the floor, knees tucked into the chest and hands on knees.
Tuck Drills
Tuck shape hold
A solid tuck shape hold should have a slightly rounded back, knees pulled in tight to the chest and feet slightly off the floor. Hands should be placed on the front of knees.
Tuck jumps
Tuck jumps are great for getting used to pulling into a tuck shape while in motion. Knees should be pulled up as high as possible with legs squeezed together.
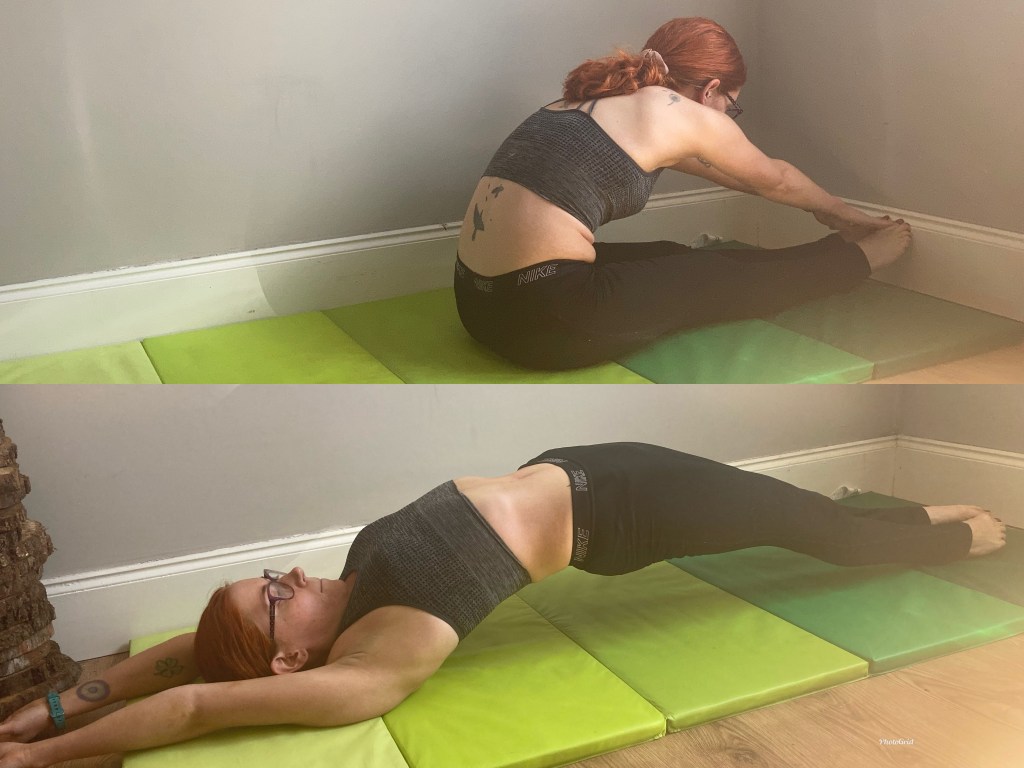
Rock and Rolls
Rock and rolls are a great prerequisite to forward and backward rolls. Starting in a seated tuck position and rocking back and forth from back to feet. Knees should stay together and squeezed into the chest. For a more challenging version try and stand all the way up between each rock, or rocking back into a shoulder stand.
Dish to Tuck crunches
A great core workout.Really important to focus on shaping in this drill, moving between a solid dish shape and a solid tuck. Legs should stay together at all times.
Handstand Bunny Hops
A great starter drill to work on getting used to weight on hands. Starting from a standing position, placing hands on the floor and kicking both legs up together in a tucked shape. Trying to keep legs in to body as close as possible and squeezing legs together.
Bonus Drills
Mini Handstand kicks
Another great drill for weight on hands work. Starting in a lunge position, placing hands on the floor and kicking off the ground slightly, returning to the ground one foot at a time. The easier this becomes the higher the kick can become, working towards a full handstand.
Insert ‘Handstand kick’ here
Kick to needle stand
A good pre-requisite for Walkovers. Starting with both legs together, kicking one leg up in front, placing the foot on the floor, placing hands down and raising the other leg behind in a needle stand. If using this as an aerial drill, arms can be pulled back to simulate aerial entry (Please ensure plenty of space in front for this option as may result in a roll out).
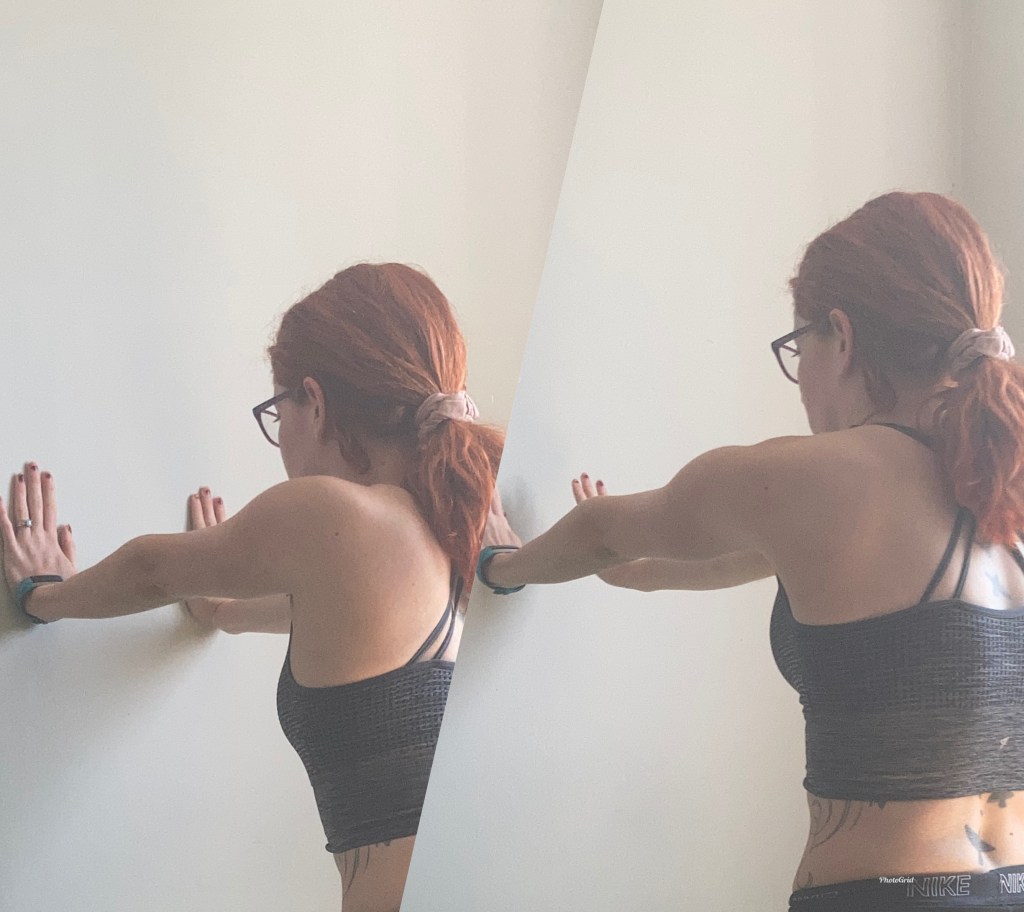
Shoulder shrugs
Shoulder shrugs can be worked in a number of ways. Start by facing a wall and placing hands against the wall. Drop shoulders forward then force back to generate movement. All movement should come from shoulders, arms should stay straight to ensure motion does not come from elbows.
This can also be completed in a front support, trying to drive hands off the floor with the motion. Another option is a triple jump into front support. Starting in a standing pike shape with hands close to the floor, place hands down and hop hands forward three times into a front support shape. A rounded back should be maintained throughout and arms straight to ensure momentum comes from shoulders not elbows.

Finally if there is sufficient space and adequate flooring handstand hops can be completed. Lunging as normal into a handstand and waiting until a full handstand shape has been achieved before pushing through shoulders to hop hands off the floor and back down.
Jump Series
This drill can be used for tucks, straights and twists. Starting standing with arms by the sides, complete one rebound jump with arms in a set position then immediately rebound jump into the correct body position (Tuck, straight, half twist, full twist). Can also be completed as an aerobic exercise working through all the body shapes with a ‘set’ rebound jump in between each jump.
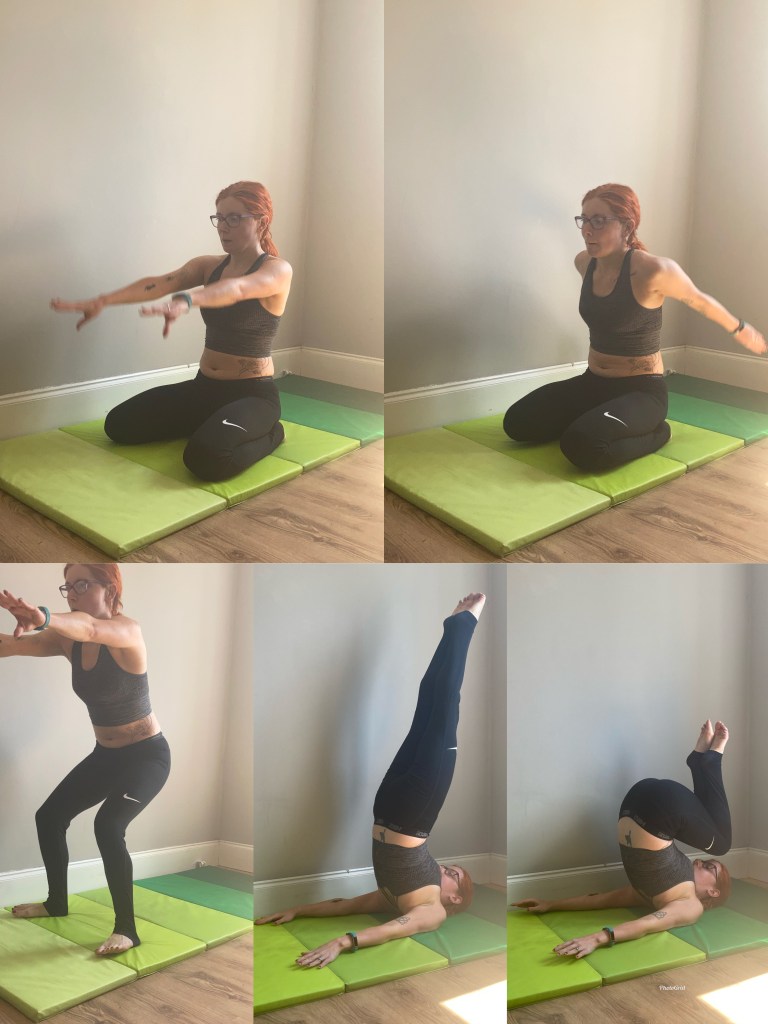
Jump Knees to feet
Finally, a great drill to work on explosive strength through the legs. Starting in a kneeling position with knees slightly apart, sitting back onto heels. To start with, swing arms to create motion and try to jump to feet. The landing position should be a squat position, with legs at a right angle. For tucks and straights this can then be added onto the beginning of a roll back to shoulder stand in the correct position. For twists, try and half turn while jumping from knees to feet.
This is by no means an exhaustive list of drills, and there are many other ways to keep muscles engaged and keep in shape from home. More and more resources are becoming available every day as Coaches and athletes alike get their heads around a new approach to the sport. So give them a go, and don’t forget to tag Cheer From Head to Toe or #CFHTT in all photos and videos!

Written by Molly
97% of people who follow CFHTT website enjoy following our social media platforms
@Cheerfromheadto
Discover more from The UK's number one Cheerleading Blog
Subscribe to get the latest posts sent to your email.
